
zsh を入れようと思っていたんだけど、GDM でログインしたときの /etc/profile の扱いとか相変わらずわかりづらいので bash のまま行くことにした。
Starship のインストール
Starship でプロンプトをカスタマイズする。
ターミナルのフォントは HackGen Console NF を設定しておく。
インストール
公式インストールスクリプトを取得する。
curl -sS https://starship.rs/install.sh -o /tmp/starship-install.shインストールを実行する。
sh /tmp/starship-install.sh標準では /usr/local/bin/starship にインストールされる。書き込み権限が必要な場合は、インストーラが sudo による権限昇格を要求する。
Bash で有効化
~/.bashrc の末尾に追加する。
# Starship prompt
eval "$(starship init bash)"
これはStarship公式のBash向け初期化方法。新しいBashを起動して確認する。
bash設定ファイル
Starshipのユーザー設定は、~/.config/starship.toml に記述する。これはStarship標準の設定ファイル位置。
今回の設定は以下。
format = """
[\\[$username$hostname$directory\\]](bold bright-cyan) $git_branch$git_status$fill $cmd_duration
$character"""
[os]
disabled = false
format = "[$symbol]($style) "
[os.symbols]
Ubuntu = ""
[username]
show_always = false
format = "$user@"
[hostname]
ssh_only = true
format = "$hostname:"
[directory]
format = "$path"
truncation_length = 4
truncate_to_repo = false
[git_branch]
symbol = ""
format = "[$symbol $branch](bright-purple) "
[git_status]
format = "([$all_status$ahead_behind]($style) )"
conflicted = "=$count"
ahead = "↑$count"
behind = "↓$count"
diverged = "↑${ahead_count}↓${behind_count}"
untracked = "?$count"
stashed = "≡$count"
modified = "!$count"
staged = "+$count"
renamed = "»$count"
deleted = "-$count"
[fill]
symbol = "·"
style = "white"
[cmd_duration]
min_time = 5000
format = "[ $duration]($style)"
[character]
success_symbol = '[\$](bold bright-green)'
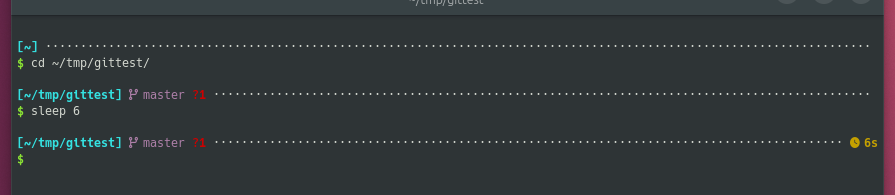
error_symbol = '[\$](bold bright-red)'こんな感じで表示される。一番上は表示項目が少ない場合(Git 管理されていないディレクトリ)。二番目は Git 管理されたディレクトリ。三番目はコマンドの実行が長い場合。
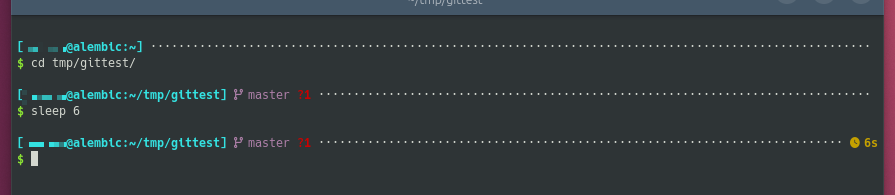
SSH の場合はユーザ名とホスト名も表示される。
SSH 設定
構成
基本的に Ubuntu 26.04 の GNOME 標準環境をそのまま利用。
OpenSSH client
│
│ SSH_AUTH_SOCK=/run/user/1000/gcr/ssh
▼
GCR SSH Agent
│
├─ ~/.ssh/*.pub を認識(preload)
│
├─ 必要時に秘密鍵のunlockを要求
│
└─ GNOMEのSecret Serviceと連携可能
│
▼
OpenSSH ssh-agent
こんな感じ。
認証システム:GCR SSH Agent
SSH 鍵管理には、Ubuntu GNOME 標準の GCR SSH Agent を使う。
SSH_AUTH_SOCK=/run/user/1000/gcr/ssh となっていて、gcr-ssh-agent.service と gcr-ssh-agent.socket が有効になっている。
gnome-keyring-daemon は --components=pkcs11,secrets で動作。昔の GNOME では SSH Agent になっていたような気がするが、今は違うみたい。
- GCR: SSH Agentのフロントエンド・鍵の取り扱い
- GNOME Keyring: Secret Serviceなどの秘密情報管理
- OpenSSH ssh-agent: GCR内部で実際のSSH署名処理を担当
こんな感じになっている。もう eval "$(ssh-agent)" とかは必要ないみたい。
GNOME にログインした(セションが始まった)時点で ssh-add -l すると、2048 SHA256:... <公開鍵のコメント> (RSA) となっている。実際に SSH すると GCR の UI でパスフレーズを要求される。
GPG 復元
環境
Ubuntu 26.04 標準の GnuPG を使用。基本的に Ubuntu / GnuPG の標準の状態。
- GnuPG: 2.4.8
- GNUPGHOME: /home/nakase/.gnupg
既存 GPG 鍵の復元
暗号化バックアップを復号して解凍する。暗号化バックアップファイルは ~/secure-work/gpg-backup.tar.gz.gpg。
$ mkdir -m 700 ~/tmp-gpg-restore
$ cd ~/tmp-gpg-restore
$ gpg --output gpg-backup.tar.gz --decrypt ~/secure-work/gpg-backup.tar.gz.gpg
$ tar -xzvf gpg-backup.tar.gz
$ gpg --import gpg-backup/secret.asc

($ gpg --import-ownertrust ownertrust.txt)
gpg-backup.tar.gz の解凍後(インポート前)に gpg --show-keys --with-fingerprint --keyid-format long gpg-backup/secret.asc で鍵の確認。また、インポート後に gpg --list-keys --keyid-format long で公開鍵を確認。さらに gpg --list-secret-keys --keyid-format long で秘密鍵を確認。
事前に確認した fingerprint D1201762D12553F0D0086AD087BE2888430B755B の自分の鍵に ownertrust を設定。
$ gpg --edit-key 87BE2888430B755B
gpg> trust
  *** 「5 = 究極的に信用する」を選択 ***
gpg> quit
gpg --list-keys --keyid-format long で確認。
gpg --export-ownertrust > ~/tmp-gpg-backup/ownertrust.txt でエクスポート。(※次回復元時はこれも復元)
コメントを残す